Decal Inventory
The Decal Inventory function allows you to enter decals into the system and to track the status of every decal. To access the decal inventory functionality, go to Utilities | System Administration | Decal Inventory. The decal Maintenance screen displays.
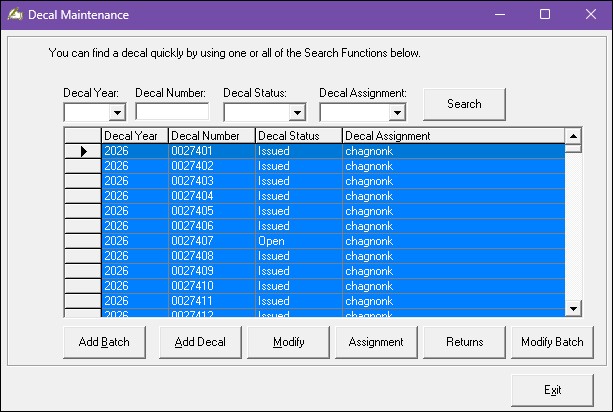
Decal Search
You can search for a decal by Decal Year, Decal Number, Decal Status, and/or Decal Assignment. The more information you enter, the more defined the search will be. For example, if you want to find 2020 decal number 0000050, you would use the Decal Year dropdown box to select 2020 and enter the decal number into the Decal Number text box and click Search. The grid will show one decal, as there is only one decal for 2020 with that number. Had you only entered the decal year 2020 and not the decal number, the grid would display every 2020 decal.
Add a Batch of Decals
To add a new batch of decals to the system, click on the Add Batch button. As DMV sends multiple packets at once, you can enter the whole inventory in one batch, as long as the decal packets are sequential in numbering. For example, you receive an order of 3 packets of 2020 double decals, with the first packet numbered 0000001 to 0000100; second packet 0000101 to 0000200; third packet 0000201 to 0000300. To enter the decals into the system you can enter the Beginning Decal number as 0000001, the Ending Decal as 0000300, Decal Year as 2020, and a Decal Status as Open. This will enter all 300 2020 decals into the system at once. If, for some reason, DMV sent you a packet at the end that was numbered 0000501 to 0000600, you would need to enter this batch separately.
Decal Color
Decals are made with each year having a different background color. In order to assist you in visually making sure you are giving the correct year decal, you can assign a background color to that year's decals. Then, when you are processing a registration, the decal text box will display the background color you selected, indicating the decal you should be giving to your customer. Once you have set the color of the decal for a given year, you will not need to change it every time you enter a new batch.
To set the decal color for a new year, go to Utilities | System Administration | Decal Inventory. Click Add Batch, enter pertinent information, and click the Decal Color button to select the color of the decal, choose the color you want, and click OK.
To modify the decal color, go to Utilities | System Administration | Decal Inventory, select any decal in the grid and click Modify. Click the Decal Color button to display a color grid, allowing you to select the color for that year’s decals. For example, the 2020 decals were orange, so you would select the color that best matches the decal year. Once you click OK a message will display asking if you want to change the color of the text contained in the decal text boxes. The only time you would want to change the text color would be if the decals are a dark color and the decal numbers will not be seen unless you change the color. For example, if the background color for the decals is dark blue, you would want to change the text color from black to white in order to see the decal number. If you answer No the system will default to black text. If you answer Yes, the color grid will display for you to select the color.
Add a Single Decal
The Add Decal button allows you to enter a single decal into inventory and follows the same instructions above except you will only be entering one decal.
Modify a Decal
The Modify button is used to update a single decal in the system. It is frequently used to change the status of a decal from Open or Issued to Damaged. To modify a decal, search for the decal and click Modify. Use the available text and dropdown boxes to make the change. A Change Reason text box is available for you to type the reason you are changing the decal. Once the change is made, click Save.
Modify a Batch of Decals
Use the Modify Batch button to change the year for all decals in a batch. This is intended for correcting batch-level errors, such as decals entered as 2025 that should be 2026.
Decal Assignment
The Assignment button allows individual decals or ranges of decals (e.g. a book) to be assigned to a specific user. Once you assign decals to a user, the system will auto-populate the decal field with the next available decal for that user as the user processes transactions. For example, if the supervisor assigns the 2020 double decals from "0000001" to "0000010" to the user "brochum", when "brochum" processes a 2020 renewal the first available decal "0000001" will appear in the decal text box. This feature can save time and typing errors. However, it can also create problems if you do not verify the decals that auto-populated with the actual decals you give to the customer.
To enable the Default Decals option, select Utilities | System Administration | System Options. Within the System Settings dialog box select the Motor Vehicle Settings tab and click on the Default Decals checkbox, located above the Save button.
Once you have enabled the Default Decals setting, you will need to assign ranges of decals to specific users. To assign decals to users, select Utilities | System Administration | Decal Inventory, and then within the Decal Maintenance dialog box press the Assignment button. Enter the decal year and the beginning and ending decals for the range you wish to assign to a clerk, and then select the specific clerk from the Decal Assignment dropdown list. Press Save to complete the decal assignment. You will need to assign ranges for each category of decals separately (e.g. 2019 doubles, 2019 singles, 2020 doubles, and 2020 singles).
Note that you can still add ranges of decals to the inventory when you receive them from DMV without assigning them to a specific user. You can then return to this process as you need to assign specific ranges of existing decals to users. Also note that when you first enable this feature, you may need to manually type in the first decal to be issued. Following that, the system will increment the default decal automatically.
Return Decals
Once a year, clerks are required to return the prior year's unused decal inventory to DMV. The selecting the Returns button allows you to mark a range of decals in the system as “returned”. Simply enter the decal range you are returning into the Beginning Decal and Ending Decal text boxes. Note, you should enter in each packet separately, as the numbers must be sequential. Next, enter the year of the decals into the Decal Year text box. Use the Decal Status dropdown box to select Returned. The Change Reason text box allows you enter additional information. Finally, enter the date you returned the decals into the Returned Date text box. Once all the information is correct click Save. The database is updated to reflect the changes.
To view a report showing the returned decals go to Reports | Inventory Items. Under the section labeled Display Inventory For, select Decal # from the Inventory Type dropdown box and Returned from the Status dropdown box. Then click View.